Knowledge of effective troubleshooting practices can go a long way toward getting equipment back on line quickly. Unfortunately, due to many reasons troubleshooting occupies too much of a technician's time.
You might consider these six key elements to improve your troubleshooting skills:
- Understand the system
- Understand the problem and history
- Eliminate the obvious
- Develop possible causes and theories
- Eliminate causes, start with what is easy, or likely
- Validate and document the solution
Firstly, if you do not understand the system and how it functions, you will be thrashing around in the dark. I found the best time to understand was while the equipment was running and producing product. Time spent studying the process while the equipment was running paid huge benefits when issues arose.
It was always beneficial to listen closely to what the operator saw, heard, noticed, and did, just before the problem occurred. I learned quickly that a good operator was a great asset. They can be a valuable part of the troubleshooting process, especially with chronic problems.
When it comes time to start diagnosing the problem remember to check and eliminate the obvious possibilities first. Check the basics like air, water, power, e-stops, and fuses. I find that troubleshooting is more like peeling the layers of an onion back than digging rabbit holes. The biggest danger is that you would dive too deeply down a particular path (a rabbit hole) and realize it is a dead end. Good troubleshooters will start with the obvious potential causes, eliminate, and then develop deeper possible causes and theories.
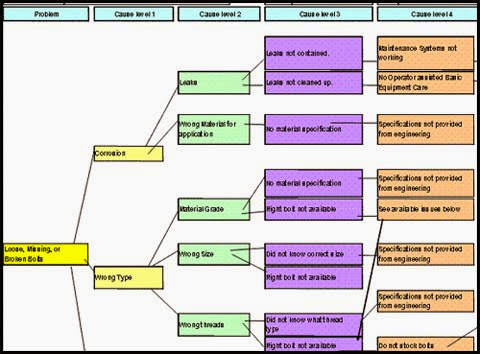
Figure 1: Example of a Tree Diagram
I personally like to use a tree diagram (see Figure 1) to develop multiple theories as to what could cause the problem. I then look for ways to eliminate entire branches of the tree. For example if I believe that a vacuum valve on a system may not be functioning, I might find a way to bypass the valve and see if I can manually activate the system. Again, I am looking for clues as to where to dig deeper. One point worth mentioning is that after I have conducted tests to eliminate possible causes, I sometimes need to pick the most likely component and remove it for inspection. The trick is to investigate deeper; remember, do not dive too far too fast.
I also find that certain possibilities are easy to eliminate, yet fairly likely to be causing the issue. I will likely take them out first. I was troubleshooting a check engine light on a car, had four possible causes: vacuum line issue, vacuum control valve issue, EGR valve not switching, and EGR position feedback. I found that I could eliminate the 3 out of 4 possibilities by bypassing the vacuum control valve. If the EGR did not switch, it meant I had a leaky line or bad EGR diaphragm. Moving a vacuum line was far easier (and cheaper) than pulling off or replacing the EGR assembly; so that was my first test. Once I found the problem, a plugged outlet tube, I bypassed the valve by manually forcing the EGR valve to switch, verifying that all components were working.
Lastly, I am a huge fan of checking back with the operator a day after the repair to validate we have resolved the issue. It not only avoids embarrassing repeat calls; even when the repair worked, you will buy good press with the operators.
Read more: http://info.marshallinstitute.com/bid/52715/Effective-Maintenance-Troubleshooting-6-Key-Elements


Comments
Post a Comment